
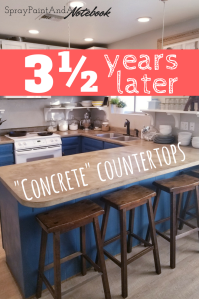
UPDATE! click here for how these counters have fared 3 1/2 YEARS LATER.
 Hey-o!
Tara here.
Novel writing exploits took a backseat today. Lucky you? I was perusing Pinterest this morning and saw another concrete-over-laminate countertop pin. You know the countertop treatment popping up on the internet? The one using Ardex Feather Finish concrete “painted” over sanded-down laminate or formica countertops? I smiled to myself, remembering when I first saw those pins and thought rather smugly, “Oh, we could totally do that!” Well, last summer, I took that smug opinion and put my (not much) money where my confident mouth was.
If you’re wondering how that treatment holds up, this is the post for you. There may be hints and tips and tricks, but this is by no means a how-to post. This is a how-did-it-hold-up reality post.
Yes, this is a new type of post for the ol’ blog, but it’s my blog. You’re not the boss of me.
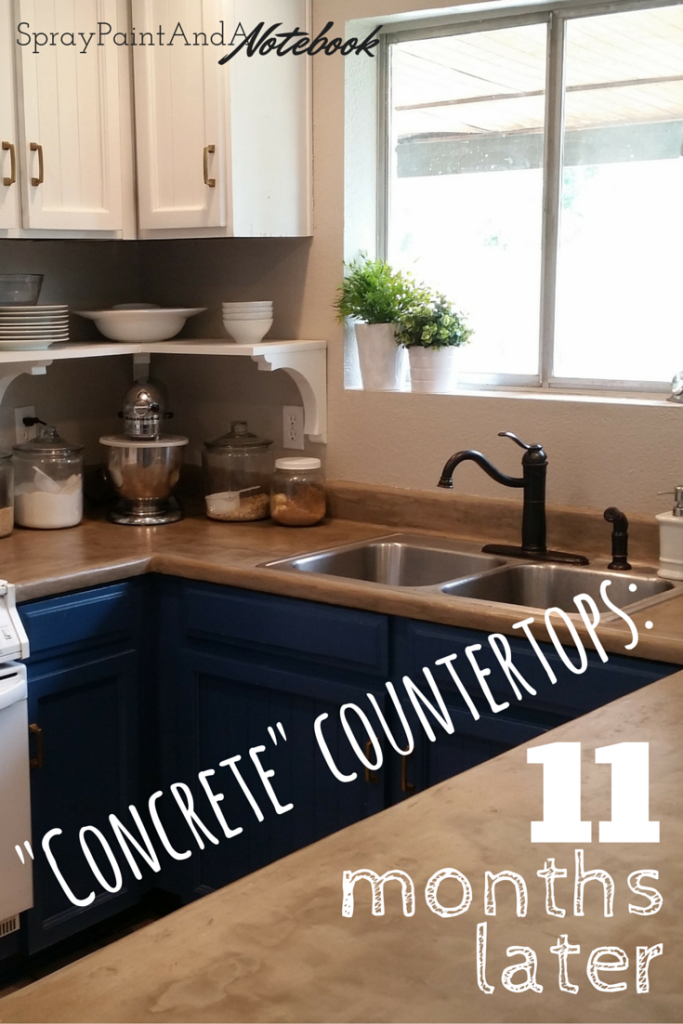
 What do you think of my on-the-cheap, mostly DIY kitchen remodel? I’ll post more (including the unrecognizable before photos) on that one later. I still have a couple of things left to do. But for now . . .
The house the hubs and I bought last summer had pretty awful laminate countertops. They were probably great in their hay-day, but we must have inherited them from a butcher . . . or serial killer. I’m talking knife gashes and slices everywhere. Chunks missing.
Had I a bigger budget, I might have sprung for the quartz countertops I really wanted. But after raising the kitchen ceiling, electrical work, A/C duct work, new lighting, and DIY shelving, (it was a brutal summer) we basically had enough money for paint. And maybe cheap cabinet pulls.
So, we took the plunge. The Ardex Feather Finish countertop plunge.
Total cost- Approx $125
Concrete– $25 (which I purchased at a local floor covering supply store)
Cheng Food-Grade Concrete Countertop Sealant- Either $30 (small bottle for up to 40 sq. feet), or $100+ (Huge 4L bottle – you’ll have lots of leftovers for re-sealing down the road or for other projects)
What we already had on hand
Painter’s tape, plastic drop cloth, face masks, electric sander, utility knives, taping knives (a.k.a. drywall spatulas) similar to these, old bowl/bucket, whisk, old soft rags.
Time
It took 3 adults (one of which had done this before) one long evening, then 2 adults for a second night. That said, we had an electric sander. If you are sanding by hand, expect it to take a lot longer.
To begin, we wood-putty’ed over the missing chunks in the counters. Then we sanded with an electric sander, and savagely scuffed those original gashed badboys with utility knives. That was just as fun and it sounds. Then came the many, many super-thin layers of Ardex (with sanding between each coat). After drying came the sealant layers. Then the waiting game.
Ready for the good stuff? The big questions?
#1 – How have they held up? Surprisingly well, actually. Are there chips? Yes. Are there dings? Sort of. Are there scratches? Eh… Are there stains? No. (Yeah, I was surprised by that one, too.)

Chips. (See the lighter gray dots?) This happens when something both heavy and sticky is left on the countertop. When said item is picked up later, chips can occur. I’ve got 4 tiny chips in the corner by my stand-mixer, 2 next to my stove, a long-skinny chip up against the wall by the stools, and another little tiny one in the main workspace. (When I say tiny, I’m talking pin-head tiny, not even as big as a pencil eraser). Not bad for nearly a year of wear and tear from our rambunctious family of four.

Dings. This only happens in this one small part of my countertop, no bigger than a 5-inch square. (Apologies for the weird lighting, it’s the only way I could get the camera to show my dings.)

Why does it ding? Because this part of the countertop for some reason is much thicker than the rest. We probably missed this in sanding one of the layers. Maybe it soaked up more sealant and therefore has a little give to it? I’m not sure of the science behind why the thicker concrete dings.
Normally, each layer gets sanded down until completely smooth, almost as thin as paint, resulting in a final, smooth surface. This little section was never completely smooth, and noticeably thicker.
The plus side: I highly doubt this thick part will chip. But it has definitely “aged” with these lovely “character” dings. I actually kinda dig ’em.
Scratches. Truth be told, I didn’t notice any at all. Then I read Sarah’s experience with scratches and looked very, very, closley. Technically I guess you could say there are things that look like scratches. But they’re not like mini slices through the sealant, they’re like tiny, almost imperceptible lines scattered throughout. Like my dinged section, but to 1/10th of the degree. Almost like the miniscule leftover markings on a pad of paper from a previous sheet: the ones you only notice if you color the clean sheet carefully with pencil lead to reveal the hidden message. They don’t even show up in the sunlight unless you are really searching for them. I think maybe Sarah’s showed because her countertops were black and she used non-countertop wax to try to seal them.

Stains. Yes, I said there were no stains. In truth, no amount of berry juice, melted popsicle, soy sauce, or other nefarious stainer has penetrated our food-grade concrete sealant. However, right along the seam to our stove, oil/grease seems to have seeped into the concrete. See the darker half circle right at the edge? I’m guessing our tape job (to protect the countertop-installed stove during this whole concreting process) wasn’t up to par. Or maybe when we pulled the tape up afterwards, it pulled up a tiny bit of the sealant. I don’t know. But, yes, I do have those tiny pockets of oil along the edge.
See the little dots an inch to the left of the stove that look very similar to the oil/grease stains? That’s what happens when water is left pooling on the countertop over the top of a chip. (I had just finished cleaning the counters before I took the picture). Water is absorbed through the tiny chip, then spreads out wider underneath the sealant. Guess what? They dry! Those little dark dots disappear after about a half hour.
Which brings me to a stain precautionary: It has not happened to me, but I would venture to guess that if berry juice (or other stainer) was left pooling over a chip in the surface, and it absorbed, and then dried, it very well could stain. Just a thought.
Ok, at this point, some of you might be asking “Tara, why don’t you just dab a little sealant over the chips?” The sealant requires a process, which I could try, but I’m scared of it turning out uneven and looking worse than the teeny tiny chips do. To appease you, dear readers, I might try it and post about later. We’ll see. To get a flawless seal, I would have to re-sand and seal the entire countertop. And I am not quite ready to do that just yet.
#2 – What would I have done differently? A few things.
First: I’d do more layers of concrete.
I think we did 5 really thin layers. Yes, the surface is super smooth, but I actually would prefer a surface more like my little 5-inch section with the character dings (another pic zoomed out below). Personal preference, but I like dings more than chips. The thin-ness in some areas makes me a tiny bit nervous. It’s pretty thin.
Second, I’d heed the directions a little better with the sealant.

See the photo above? The dull bit in the sunlight? Right above my dinged up section? That’s a spot where the our sealant didn’t soak in as well as it should have. I’ve got two of them. This is because we didn’t get the concrete wet enough during the sealing process. When they say get it wet, they mean really wet. Wet enough to soak into the concrete and stay wet while you apply the sealant. That spot must have dried too much by the time we got the sealant wiped over the top. It doesn’t stain, and it doesn’t soak up water like the chips do, but it’s not as shiny. So it’s noticeable in certain lights.
#3 – Would I do it again? Absolutely.
This is a fantastic countertop. It looks great, it feels great, and it holds up better than I thought it would. As a matter of fact, if I get enough chips to necessitate a change, I’m planning on doing it again. Tape off the room with plastic, a little (or lot) of sanding, a few more layers, and re-seal. Though I’m guessing I’ve got a while before that will be necessary.
The only thing about this countertop that I can’t do that I wish I could do: run a flat razor blade over the surface to clean hard, crusty bits. I’m pretty sure it would knick the sealant if the blade caught a ding, chip, or other imperfection.
HOWEVER, the project is labor intensive. And takes a significant amount of time. And very messy. (Use the hose or utility sink to clean up, not your kitchen sink, which should be taped off and covered anyway.) And concrete dust will be EVERYWHERE.
Also, this is not a 3 hour project. This is not a one-night project. And if I were you, I’d tape painter’s plastic over entrances, doors, cabinets, etc. to keep the insane amount of dust contained. (Remember the sanding? Lots of sanding.) Be prepared and willing. We weren’t moved-in when we did this, and I am so glad I didn’t have to wipe concrete dust off of belongings in addition to house surfaces and fixtures.
If you don’t have the money for solid countertops like marble, quartz, granite, or even butcher block, I’d suggest this as a great alternative to cover those old laminates. If you didn’t already know, this Ardex treatment is cheap.
I’d also do it if I had older cabinets and didn’t have the money for new countertops and cabinets. Because putting expensive countertops on older cabinets is not a good idea. The counters will likely crack if you later try to take them off to replace your cabinets, and you might just decide on a different cabinet footprint and wouldn’t be able to use your previously installed expensive countertops anyway.
AND… again… we had serial killer countertops. And a tiny budget. What choice did we have?
Dang, I’m proud of my DIY kitchen remodel. Just wait until I finish adding my tarnished gold pulls to those blue drawers and finish up my crown molding.
For in-depth instructions, visit: Here, Jenny over at LittleGreenNotebook.blogspot.com, and then here, Laura over at ABeautifulMess.com.
So, there you have it, folks. The not-so-ugly ugly truth behind those internet concrete-over-laminate countertops.
AAAAAND NOW, click the photo below to see how these counters are doing 3.5 years after install!

Hi Tara
Just a couple of questions. I am worried about bacon grease splatter. Is this going to stain my counter?Also, did you stain your counter? Your counter looks to be more of a brown than gray.
LikeLike
Hi Cindy!
Depending on how you seal your counter (using an actual food-grade “countertop concrete sealant”), no, bacon grease should not stain it. I have even accidentally left grease splatter on the counter for a couple of days and it still didn’t stain through the sealant. I only have grease stains seep into the concrete where my sealant didn’t quite seal the edges between my counter and stove. That was a “user application” problem, not a weakness in my chosen sealant.
No, I did not stain my concrete. However, it may look a little brown in the photos (taken with my cell phone), but it is more gray than brown. The reason for the slight brown tinge (instead of the cool gray of the Ardex concrete) is because of the sealant which does have a little color. So yes, compared to straight-up unsealed concrete, it does has a slight brown tinge. But looking at it in person, I’d never call the color “brown.”
Thanks for stopping by!
LikeLike
Hey! Love your counters. I’ve had the materials to do mine for about a year now and still have not gotten around to doing them. I have one question that I can’t seem to find an answer to no matter how many blog posts I read on this project. DO YOU HAVE TO REMOVE YOUR SINK?! This is my biggest hang up right now because I don’t want to deal with the plumbing necessary when removing the sink. Mine is a drop in stainless just like yours. Did you remove it when you applied the ardex? If not, how did the edges turn out? Thanks!
LikeLike
Spark, I did not remove my sink. I don’t think you need to. Frankly, it sounds like a whole lot of work for countertops that are temporary. (Yes, temporary. These babies are not meant to last more than 1-3 years without a re-do). I taped it off with plastic covering the sink all around the edges. Get very very close to the edge. Like an exact fit.
HOWEVER, I pulled the tape off after we did the concrete layers and forgot to tape off again when we did the sealant. I didn’t want to pull tape off at the end of the project and leave the concrete edge vulnerable to water seepage. I figured the sealant was runny and clear, so I’d just wipe off whatever sealant got on my sink and let the sealant barely touch the stainless steel to create a nice seal. This was a very bad idea. I didn’t wipe the sealant in time. Mostly because it’s so clear at first, and you don’t see the slight color change until it’s dry and won’t wipe off. I had to fix it with a flat razor blade and a whole lotta patience. But I’ve never once had a water leak into the concrete around the sink.
I don’t have super awesome advice on this front. The edges around my stove have vulnerable openings in the seal because I kept the tape on through the sealant, so when I pulled off the tape, there wasn’t a perfect seal. (My stove is also a drop-in – not a slide out.)
Get a great seal. Don’t pull the edge of the seal off with your tape. But as for pulling out the sink, I’m not sure I’d recommend that either.
Well, that was wordy. Woops.
LikeLike
Now that it has been another year. How do you like them? Are they holding up just the same? I am getting ready to do mine and loved your updated post.
Another question are your counter tops rounded? Mine are so was looking at yours and it looks like it but just not sure.
Thank you,
Tammy
LikeLike
Hi Tammy! Sorry for the delay. Yes, I still have those same concrete countertops, going on 3.5 years now. (I wrote up and photographed the 11 month post a long time before I actually posted it). I’m not going to lie, they’ve taken a beating. I’ve got a few more chips, some saw marks (you read that right), acrylic paint drips, and scratches. They are DEFINITELY ready for a re-do. I mean, they’re not so bad that it’s completely disgusting, and I’m not mortified when people come over, but they need a re-do. I’ll take some pictures this weekend and post an updated post sometime next week? As for your questions, only the countertop edges facing the food preparer are rounded. The edges on the sides and backside of the counter (where the stools go) are squared-off edges. So, I’ve got both!
Any other questions for me now that I’ve finally logged back into this blog on my new computer? 🙂
LikeLike
Thank you Tara! I am hoping to start mine soon. My concern was the rounded edges but when I saw yours made me feel better.
LikeLike
The round edges are a bit tricky to paint over. I used a cheap foam brush to gently paint as evenly as I could. It works as well as to be expected. Also, I updated with a new post about those counters today! Check it out!
LikeLike